Thursday, July 15, 2010

Honey Vanilla Panna Cotta with Mango


We got a box of mangoes and I wanted to try out something new out of it. Then I remembered the Panna Cotta which I had bookmarked. Opened my bookmark manager and sat stunned for a while. Did I bookmark these many recipes? I never bothered to open and try out the bookmarked ones. Ok… Now let me start clearing out the bookmarks. Not by just deleting it, but by trying it out.

It was quite difficult for me to find out the Panna Cotta and just because I remembered that it was from Nisha’s ‘Look who is cooking too’, I directly dropped in there and searched this out. I made a slight modification on the original recipe just coz I was running out of whipped cream, still could come out with the great dessert.

Sat down for another 2 hrs and organized my bookmarks J


Ingredients – Bottom Layer - Panna Cotta:

Whipping Cream                   --    150 ml (5 oz)
Whole Milk                             --    50 ml (2 oz)
Sugar                                      --    3 tbsp
Vanilla Extract                       --    1 tsp
Honey                                     --    2 tbsp
Gelatin powder                      --    2 gms
 
Ingredients – Top Layer - Mango:

Mango                                     --    1
Whole Milk                             --    120 ml (½ cup)
Butter                                     --    1 tbsp
Sugar                                      --    2 ½ tbsp
Gelatin powder                      --    2 gms
 
Preparation of Panna Cotta:

Mix the whipping cream and milk in a saucepan. Add the vanilla extract and sugar and on low heat, stir continuously till the sugar dissolves. Add the honey, mix well.

Take it off the heat and add the gelatin powder. Stir well, till it completely melts and no lumps are seen.

Strain the mixture and keep aside to cool.


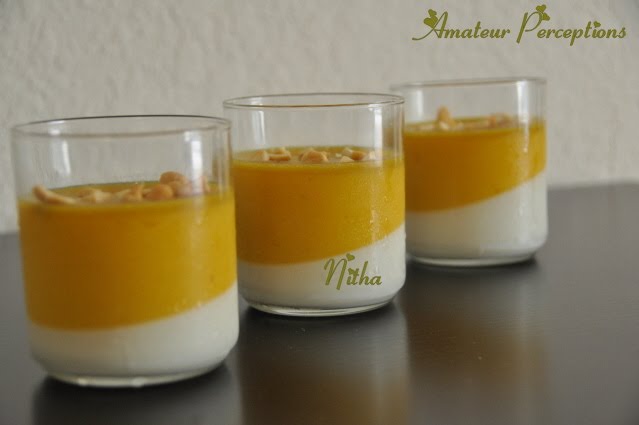
Have your serving glasses ready. Once the liquid mixture has cooled, pour them into the serving glasses. I just wanted to have them slightly slanting and did keep my glasses in a slanting position. I used some paper clips inside small plastic bowls and kept the glasses above it.


Chill it in the refrigerator for a minimum of 1 hr.

Peel and cut the mango into pieces. Blend them in a mixer by adding half of the milk and sugar.


Add melted butter to the remaining milk. Use a whisk and mix it well. It wouldn’t be a proper replacement for whipped cream, but just mix them well.

Slightly heat the mango puree in a sauce pan. Take off the fire and add gelatin and stir till it dissolves. Strain the mixture and then add the milk – butter mixture. Mix well.

Take the serving glasses out of the refrigerator and gently pour this mango mixture on top of the set vanilla panna cotta.


Chill overnight. Garnish when serving.


Wednesday, July 14, 2010

Varutharacha Prawns/Fish Curry with Dosa


Ingredients:

Fish (King Fish/Prawns)       --    ½ kg
Pearl Onions                        --    2 medium size
Ginger garlic paste               --    1 tsp
Green chillies                       --    2 - 3
Tomato                               --    ½ of medium size
Turmeric powder                 --    ½ tsp
Coriander – Chilly powder mix        --    2 -3 tbsp
Tamarind                             --    a small ball (size as that of a walnut)
Coconut                              --   ½ of medium size
Mustard seeds                     --   ½ tsp
Curry leaves                        --   1 stem
Salt                                     --    to taste


Preparation of Curry:

Soak the tamarind ball in water. Clean the fish/prawns, cut into small pieces and keep it aside.

Fry the shredded coconut and grind it into a fine paste / liquid form as shown here.

Heat oil in a pan and when the oil is hot add the mustard seeds. Let it splutter. Now add the finely chopped pearl onions, chopped green chillies, ginger garlic paste and chopped tomatoes.


When the onions become translucent, add the turmeric powder and the coriander – chilly masala powder. Saute until the raw smell of the masala goes off.


Get the juice from the tamarind and mix it into the masala. Then add the ground coconut paste.  Keep the flame on high and let the mix boil.

Once it boils, add the prawns / fish  and let it cook on a low flame.


Garnish with curry leaves and serve hot.

The same recipe can be followed for any fish. I love to have this with dosa.

I used to make dosa with raw rice as what we do at home. But raw rice @ Indian stores here is too costly and I tried using long grain rice and parboiled rice. After a number of experiments, I was finally successful with the below proportion or rice and urad dal.

Ingredients:

Long grain Rice                     --   1 ½ cups
Parboiled Rice                      --   1 ½ cups
Urad dhal                               --   1 cup
Methi seeds                           --    2 tsp
Salt                                         --    to taste

Preparation of the batter:

Wash and Soak the rice and urad dhal with methi seeds separately for about 6 hrs. Grind the urad dal with methi seeds until it becomes fine. Then grind the rice to slightly rough consistency. Add a little salt and mix both the batter together. Let it ferment overnight.

This gives soft & fluffy idlies and crispy dosas.


If you are preparing this in a large batch, you can store a part of the fermented batter in the freezer. Just remember to transfer it into the fridge, the day before you plan to use it. You can thus save the batter from extra fermentation.

Tuesday, July 13, 2010

Kootu Curry

 
This is one another veggie dish against which my sweet better half doesn’t turn his face off. Even I love this one. Whenever I have a sadhya, the first item to vanish from my plate (of course banana leaf for sadhya) would be kootu curry. At home, we used to prepare this only for Onam & Vishu. I always used to ask my grandmother to prepare extra kootu curry & payasam for Onasadhya, so that I could have the left overs for the next days as well.  Of course the left overs of the “special dishes” were meant for the younger ones @ home J and that was me n my brother.
 
 
Ingredients:

Black chick peas                   --    ¼ cup
Yam                                      --   250gm
Raw Plantain                         --   ½ of a large one
Turmeric powder                   --   ¼ tsp
Cumin seeds                          --   1 tsp
Pearl onions                          --    2-3
Whole Pepper                      --    15 – 20 pepper corns
Curry Leaves                        --   few
Shredded coconut                 --   ¾ cup
Mustard seeds                      --    ½ tsp
Sesame seeds                       --    1 tsp
Red chillies                           --    2 -3
Oil                                        --   2 tbsp
Salt                                       --   to taste
 
Preparation of Kootu Curry:

Soak the chick peas in water for 8 hours/overnight. Cook it in a pressure cooker and keep aside. Normally it takes 3 – 4 whistles to get this cooked.

In another vessel, cook the cubed yam and raw plantain with turmeric powder and salt.


Grind ¼ cup of shredded coconut with cumin seeds, pepper corns and shallots.


Once the veggies are cooked, add the ground mixture and the cooked chick peas. Mix well.


Heat oil in another pan and splutter the mustard seeds. Add sesame seeds, red chillies and rest of the coconut and fry until the coconut turns brown.

Add this in to the curry and mix well.


Serve hot with rice.


Monday, July 12, 2010

Crab Curry

AJ loves crab like anything. He ll have the crab legs even with tea as a snack, however you prepare it. We got the cooked & frozen snow crabs from Walmart. Though they don’t give the taste of the live crab which we get back home, this was also delicious.


Ingredients:
Crab                                     --    1 kg
Onions                                  --    2 big onions
Ginger garlic paste                 --    2 tsp
Green chillies                         --    3 -4
Tomato                                 --    1 medium size
Turmeric powder                   --    ½ tsp
Coriander – Chilly powder mix  --    5 -6 tbsp
Coconut                                 --   ½ of a medium size coconut
Mustard seeds                        --   ½ tsp
Curry leaves                           --   1 stem
Coriander leaves                     --   2 -3 stem
Oil                                         --    2 tbsp
Salt                                        --    to taste

Preparation of Crab Curry:

Cut and clean the crab into small pieces and keep them aside.


Fry the shredded coconut and grind it to a fine paste/liquid form. Keep it aside. (See here)

Fry the mustard seeds in oil. Once it pops out, add the chopped onions, green chillies and ginger garlic paste. Once the onions are translucent add the chopped tomatoes.


When they turn squishy, add the turmeric powder and masala powder. Fry for a minute and then add the ground coconut. Add water as per the gravy required. Once it starts boiling, add the crab and let it cook on a low flame.


Garnish with chopped curry leaves and coriander leaves before turning off the flame.


Sunday, July 11, 2010

Few quick cooking Tits n Bits:

There are certain tips each of us would be following to make our day’s work easier or quicker. I just thought of listing down few here. I shall keep updating this post whenever I find a new one.

  1. Varutharacha Thenga (Fried coconut ground to a paste):
I use this for many curries like sambar, kadala curry or any other Varutharacha curry. Instead of frying and grinding at that moment I fry one or two whole shredded coconuts at a time, grind it to a liquid form and store it in the freezer. I know that its always better to have things fresh, but this helps us when we are in a hurry. Also I’ve never felt any compromise on the taste.


The best part is to store this in an ice tray so that its again easy for you when u use them. It’s quite difficult to break the frozen block into pieces when we need only a small piece out of it. Storing in a covered ice tray solves that as well.


  1. Coriander Chilly Powder:
I ve never made this myself as I still have around ½ kg of the mix prepared by my mother-in-law which I packed from home. I got the recipe from her and here it goes.  


I am using this in a number of recipes and you can replace 1 tbsp of this powder with 3/4 tbsp of coriander powder + 1/4 tbsp of chilli powder + 1/4 tbsp of garam masala or can add these while frying coconut and grind together. Most of the recipes with this masala calls for fried and ground coconut too.


Ingredients:

Coriander Seeds        --   1 kg
Red Chilly                   --   ¼ kg
Cinnamon Sticks        --   2 – 3 big sticks
Cloves                         --   10 – 15

Preparation:

Dry roast the red chillies until they just change their colour. Keep them aside. Dry roast the coriander seeds, cinnamon and cloves until the coriander seeds start turning dark. The indicator is the roasted smell.  Make sure that you do not roast them until dark brown. The masala will turn brown if u over roast the chilly and coriander.

Mix them and grind to a smooth powder. Store in an air tight container for 5 -6 months or more.


I ll definitely have to make this one day and I shall update the pics then.

  1. Storing curry leaves:
We get a packet of curry leaves which has around 25 – 30 springs. I always used to dump the last few springs of curry leaves every time I get them because they get spoiled. I did try storing it different ways – clean and dry and keep in an air tight container, clean and freeze them etc. But none was completely successful. Yeah I should admit other ways of storing is much better than keeping them in the cover itself.

Finally my aunt gave me the idea to microwave them and then store in an airtight container. But you have to be careful while doing this. Steps are as follows.

a.      Clean and dry the leaves. Make sure that they are completely dry.
b.      Spread them in a plate and microwave this for 25 sec (Mine is a 1200 watts microwave). When done, they will have some amount of water content beneath each leaves. Wipe it with kitchen towel and let it dry completely.
c.       Once they are completely dry, store them in an air tight container. No need to keep them in fridge.


They become a kind of dried leaves but believe me; they give the taste and aroma of fresh leaves. Also make sure that they are completely dried before storing as the water content will help the growth of fungi.
A new tip I found was to keep the leaves on a kitchen tissue while you microwave it. The towel absorbs most of the moisture and hence its easy to completely get the water content off the leaves.

Thursday, July 8, 2010

Carrot Cake


Ingredients:

All purpose / Wheat flour     --    1 cup
Eggs                                    --    2 big eggs
Canola oil                            --    ½ cup
Baking powder                    --    1½ tsp
Powdered Sugar                  --    1 cup
Vanilla Essence                    --   1 tsp
Ground Cinnamon                --   1 tsp
Grated carrot                       --   1 cup
Chopped Nuts                     --   ¼ cup
Salt                                      --   a pinch

Preparation of Cake:

Sift the flour, salt and baking powder 4 -5 times. This helps to mix the baking powder thoroughly in the flour. Keep it aside.

In a large bowl beat the oil, sugar, eggs and vanilla essence. Add the ground cinnamon. Keep on mixing and add the flour mix spoon by spoon. Make sure that the flour is mixed well in the mixture before adding the next set. Fold in the grated carrots and the chopped nuts.


If the mixture is very thick, add milk to make it the required consistency.

Grease and flour a 9x9 inch pan. And pour the mixture into the pan.


Bake in a pre-heated oven at 175 degree Celsius (350 F) for 40 to 50 minutes. Check if a tooth pick comes out neat and if yes let it cool.


Wednesday, July 7, 2010

Ari Murukku


The first time when I made this, I couldn’t believe that I did it. I just had a vague idea on how to roll it and somehow mine came in shapeJ.  I remember my grandmother making this but may be only once or twice.  I remember, she did make us few letters to write our names and also various other shapes whatever we had asked her to.  I too wanted to try out some letters, but didn’t do it for some reason. May be next time J

Now that I got a better click, let me change the profile pic of my murukku J J  But I was lazy to make spiral ones from then.


Murukku 7

Ingredients:
 
Rice flour                                --   1 cup
Urad flour                               --   ½ cup
Besan flour                             --   ¼ cup
Red chilly powder                  --   1 tbsp
Asafoetida                              --   ¼ tsp
Sesame seeds                         --   2 tbsp
Cumin seeds                          --   1 tbsp
Butter                                    --   1 tbsp
Oil                                        --    to deep fry
Salt                                       --    to taste
Water                                   --    as required
 
This measurement yields around 15-20 medium sized Murukku.
           
Preparation of the Murukku:

Mix the rice flour, urad flour, besan flour, salt, red chilly powder, asafoetida, sesame seeds and cumin seeds. Steam the mixture. I did it using a muslin cloth placed inside a steamer.


Let it cool. Add in the butter and mix well. Add warm water little by little until you get a smooth dough.

Heat oil in a pan for frying.

Fill the Murukku mould with the dough and press through the star shaped place onto a foil paper/parchment paper. Let it fall on the paper in a spiral shape.


When the oil is sufficiently hot, wet your hands and carefully take the Murukku and drop it into the pan. Fry until they attain the brown colour. Drain on a paper towel and let it cool before you store in an air tight container.
That’s a wonderful crispy tea time snack.
Next  time I was lazy to make it in circles and so piped it directly in to the oil. See how that looks.
Murukku 7