Showing posts with label Cakes n Cookies. Show all posts

Thursday, February 11, 2021

Naadan Laddoo with camphor


Ingredients(Yields - 18 medium size laddoos):

Boondi:

        Kadala maavu / Besan Flour -- 1 cup
        Baking Soda --  a pinch
        Salt -- a pinch
        Turmeric Powder  -- 1 tsp (optional)
        Water -- as required
        Ghee -- 2 - 3 tbsp
        Vegetable Oil -- 2 cups or more as needed for deep frying

Sugar Syrup:

        Sugar --1 cup
        Water -- 1/4 cup
        Cardamom Powder -- 2 tsp
        Camphor -- 1 small pellet powdered(Optional)
        
To mix:
      
        Raisins --  a handful 
        Ghee -- 2 tbsp
        Kalkkandam -- 1/2 cup crushed


Preparation:

Mix the besan, baking soda, turmeric and salt. Add water little by little to form a batter similar to the dosa batter consistency.

Heat oil in a wok. Pour the batter into the hot oil through a round slotted spoon (check the mixture recipe for the picture). If the batter is too thick, boondi will be long in shape. If the batter is too thin, then boondi will be flat. Add more flour / water accordingly to adjust the consistency if needed.

Do not add over crowd the boondi in the oil as it may cling together and loose its shape. 


Let it fry just until it cooks or the sizzling stops, less than a minute. Drain onto a paper towel. Do not fry the boondi too crispy as this might not let the sugar syrup soak in.

Continue this until the batter is done.

Wipe the back of the slotted spoon for every batch, otherwise the batter will stick on it and not form a round shape.

Once the batter is done, add the prepared boondi into a bowl.  Add 1/3rd of the boondi into a mixer and just crush it to a coarse powder. Add this back to the bowl and mix. You now have a good blend of boondi powder and full shaped boondis.


Once the boondi is ready, prepare the sugar syrup. 

Mix water, sugar, cardamom powder and powdered camphor in a sauce pan. Let it boil until it starts bubbling up. Switch off the flame. Add colour at this stage if you wish to do so, I did not as the turmeric did give a nice yellow colour to the boondis. 

Do NOT wait until string consistency, it might harden the sugar as it cools. We have used only less water to form firm laddoos. If you like your laddoos to be softer, add a little more water, but not more than half a  cup.

Quickly add the sugar syrup to the prepared boondi in a big bowl. Mix well with a spoon. Add ghee and raisins (you can fry the raisins in ghee, if you wish to. I just added it as is) at this stage. 

Let it cool to touch, add the kalkkandam and mix well. If you add it while hot, it might melt the kalkkandams. The boondi might have soaked in the sugar syrup by now and you should have a warm sticky mixture. 

While it is still warm, grease your palms with ghee, take a handful of the mixture and roll into ball. Work quickly, not bothering to shape it well. Once all the balls are made, wash your hands, grease again and then roll the balls into a smooth shape.

Let it sit for a day to let the flavors blend well. 

Enjoy !! 


- I couldn't take any step by step pictures. Will make a note to take some good pictures next time and update :)


Tuesday, August 4, 2020

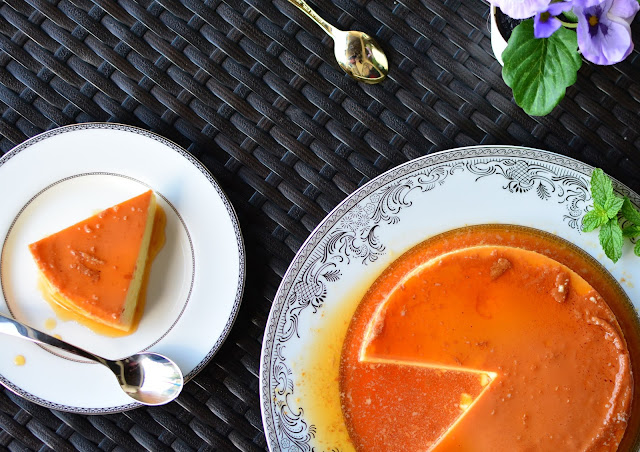
Caramel Custard - Instant pot Version


Ingredients (Serves  8 – 10):
         Milk                            --   2 cups 
         Eggs                            --   3
         Sugar                           --   ½ - ¾ cup (As to taste) 
         Sugar to Caramelize    --   1½ tbsp 
         Vanilla Essence            --   ½ tsp 


Preparation of caramel custard pudding:

Prepare a 6 inch cake tin and keep aside. 

You can also use multiple ramekins and stack them in the instant pot. I have tried stacking 2 6 inch cake tins in the instant pot and it worked perfect.
 
For the caramel, add the sugar with 2 tbsp water in a small sauce pan and heat on medium flame. Let it boil. Once it starts to bubble, reduce the flame to medium low. This need a little patience. Stir continuously to have an even colour. Let it caramelize. Once it turns brown, look for the colour you are looking for and switch off the flame as soon as it is achieved. It just needs seconds to burn the caramel.

Quickly and carefully pour the caramel into the pan and swirl it to make sure you have an even coating on the bottom. Let it cool.

Never ever try to touch or lick the caramel at any stage before it is completely cool.

Beat the eggs well until it is smooth. Add the milk, sugar and vanilla essence. I use either a hand mixer or just blend all together in a blender until well combined.  

Pour the mixture onto the cooled caramel. Cover if with a foil to avoid any moisture getting into the custard.


Add 1 cup water into the instant pot. Keep the filled cake tin on the steaming rack and carefully keep this in the pot.

Close the lid and with the venting knob on sealing position, pressure cook at high pressure for 15 minutes. Let the pressure release naturally, approximately another 10-15 minutes. 

Once done remove the foil cover and gently dab any moisture on the custard with a kitchen towel.  At this stage the center might look a little wiggly, but it will set well as it cools.
 
Let it cool to room temperature and refrigerate until they are chill. 

Use a butter knife or back of the spoon to separate the custard from the sides of the pan and turn it upside down onto your serving dish. Slice and enjoy !!!


Sunday, July 19, 2020

Mango Cheese Cake - Instant Pot version


Ingredients:
Crust:  
     Graham cracker/Vanilla biscuits       --   9-10 rectangle sheet / 15 vanilla biscuits
     Dark brown sugar                                --   1 tbsp
     Unsalted butter                                     --   2½ tbsp
Cheesecake filling: 
     Cream cheese softened                       --   1 lb; 2 bars of Philadelphia cream cheese
     White sugar                                           --   ½ cup
     Mango pulp                                            --   ½ cup
     All purpose flour                                  --   2 tsp
     Eggs                                                        --   2 large whole and 1 large yolk


Preparation of the cheese cake:


Grind the crackers/vanilla biscuits into a fine powder. Add the brown sugar. Add the melted(and cooled) butter to the same and mix it well with the hand. Mixing the butter in the blender doesn't work for me as it gets stuck. But you can give a try.
           
Prepare a 7 inch springform pan. Slightly butter the bottom and the edges, evenly. Line the bottom with a sheet of parchment paper. 
Spread the mixture on the bottom of the pan evenly and press down hard, using the back of the spoon. Freeze for 20 - 25 minutes.      
Prepare the instant pot and the cheese cake filling while the base freezes.  
Add the softened cream cheese, sugar, flour and mango pulp to the mixer. I used a stand mixer. Mix until the ingredients are just combined well, approximately less than a minute on medium speed. Make sure not to over mix. 
Add the eggs one at a time and mix for 10-15 seconds, before adding the next one. Again make sure not to over mix. 
It should be a thick flowing consistency and all ingredients well combined with no lumps. 
Pour this to the prepared pan. Tap the pan gently on the counter to burst any air bubbles.
            Add few drops of mango pulp on the top and gently poke it to decorate - purely optional.
Cover the pan with a paper towel and then use a foil on top of the paper towel and crimp the sides of the foil onto the pan. This helps to make sure that the paper towel is held in place. The paper towel helps to absorb any moisture while the cake is being cooked. - My paper towel slightly got drooped down and you can see the imprint on the cake.
To prepare the instant pot - Add one cup water to the instant pot and insert the steamer into it.   
Carefully place the covered pan on the steamer. Close the pot with the lid and set the pressure release to sealing. Select the pressure cook option and cook for 37 minutes on high pressure.  
Let the pressure release naturally. Once done, open the lid, carefully pull out the pan and remove the paper towel / foil cover. Carefully use another paper towel to dab any excess moisture. Let it cool on the counter for another 1 hour. The center might look a bit wiggly and thats perfectly alright. It gets set as the cake cools. 
To remove the cake from the pan, use a butter knife or a cake spatula to run through the edges of the cake. Carefully remove the lock and lift it off. 
Refrigerate for 6-8 hours. It is easy to remove the bottom, once it is cooled. Slide a cake knife carefully under the parchment paper and slide it onto a cake pan. 
          Slice and Enjoy !!!


Recipe Courtesy: Ministry of Curry

Sunday, August 25, 2019

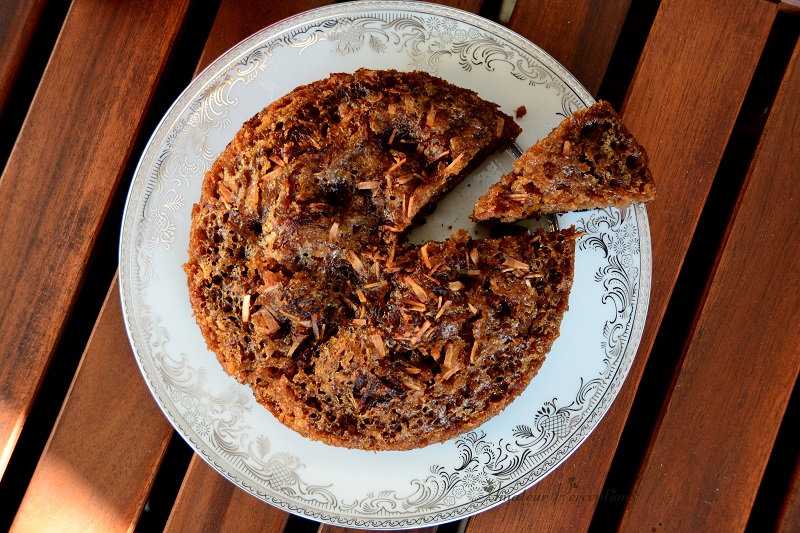
Kalathappam

A post after a long while… I would never complain as lack of time for not being active here as I believe everyone can make their own time for their priorities. The blog just came down in my priority list considering various other factors that popped up.


This recipe is a keeper and I had to save it somewhere. The books and papers are least referred nowadays and I had to have this in my own space. The trigger to prepare this was having this yummy snack from a friends and getting it right to perfection was all from the video blog of Veena.


Ingredients(Serves 8 - 10):

Jeerakashala Rice / Kaima rice  --  1 cup (You can also use ponni raw rice, but kaima is the best)
Cumin Seeds       --  ½ tsp
Cardamom          --  seeds from 2 pods
Cooked Rice       --  2 tbsp
Jaggery                --  250 - 350 gm (based on how sweet you need)
Water                    --  1 ½ cup
Coconut Oil         -- 4 - 5 tbsp
Sliced Coconut  -- 3 tbsp, thinly sliced
Shallots                -- 1, thinly sliced    
Baking Soda       -- ½ tsp
Salt                        -- As required


Preparation:

Soak rice for 4 - 5 hours or overnight.

Wash and drain the soaked rice. Add the cumin seeds, cardamom seeds, cooked rice and ½ cup water to the drained rice and grind it to a very fine mixture. Once it is done add another ½ cup of water to it and mix well.

Meanwhile, melt the jaggery in ½ cup of water. Once completely melted, strain the syrup into the prepared batter.

Add baking soda and salt to the batter and stir well.

In a small pan, add 1 - 2 tbsp of coconut oil and fry the sliced coconut and the shallots until golden brown. Strain and keep aside.

In a sauce pan heat the batter to luke warm temperature. Make sure the flame is medium - low and you keep stirring while heating the mixture. If not there are chances that the mixture gets cooked in the sauce pan. Keep it aside.

While heating the batter(depends on how much you can multi task) or after keeping the batter aside,  heat the pressure cooker on high flame. Once it is really HOT, add the left over coconut oil from frying the shallots and coconut and the remaining 3 tbsp of coconut oil. Swirl it well on the sides of the cooker to grease it well.

Add the batter to the HOT cooker. Top it with the fried coconut pieces and shallots.

Close the lid of the cooker with the washer on and no whistle / weight. Let it cook on high flame for 90 seconds and then quickly switch it to the lowest flame and let it cook for another 15 minutes.

Switch off the flame and move the cooker to a cool place. Let it stand for another 15 - 20 minutes and you can slowly take the appam out of the cooker.

The water to rice ratio is quite important to have the right consistency on the batter. I usually store my jaggery melted and strained. Hence I ground the rice mixture with ½ cup of water and mixed 1 cup of semi-thick(a little lighter than maple syrup consistency) jaggery syrup into it.

The type and size of the pressure cooker also matters. It is preferable to use a short aluminum cooker with a wide mouth, but it will still work on any. I used a 3 liter steel cooker. Using a steel cooker might burn the bottom of the appam slightly (as you can see in mine). I just slit that part off before eating and the remaining was still yummy :)


Recipe Courtesy: Veena's Curry World

Sunday, August 7, 2016

Ice-cream Sandwich Cookies


Ingredients (Yields around 15 sandwiches):

Salted butter        -- 1/2 cup (1 stick)
Yellow cake mix -- 1 (16.5 oz) box
Maple & Brown Sugar instant oatmeal -- 2 (1.5 oz) packets
Eggs                          -- 2 large
Mini Choco chips -- 1 bag (12 oz)

Vanilla Ice-cream -- 2 quarts


Preparation:

Preheat oven to 350 degrees F. Line a cookie sheet with parchment paper.

Melt one stick of butter until golden brown, whisking constantly after butter melts. Immediately pour into the bottom of a large mixing bowl. Let it cool slightly.

Add cake mix, oatmeal, and eggs and beat on low speed until just combined. Stir in chocolate chips. Make sure that the mixture is not too warm while adding the chocolate chips - It might melt if too hot.


Scoop 1.5 tablespoons of dough onto prepared cookie sheet. Bake for 10 minutes, until edges are just starting to turn golden brown. Let it cool completely before sandwiching.

Line a baking pan(or any freezer compatible dish) with aluminum foil or cling wrap. Spread the ice-cream evenly, thickness as required to be in the sandwich. Let it freeze for 2 - 3 hours.

Assembly:

Line a piece of Al foil or cling wrap on the counter. Take 2 cookies of almost the same shape and size.

Using a round cookie cutter, almost the size of the cookie, cut the spread ice-cream and sandwich it between the cookies. Wrap it immediately in the foil/wrap and transfer to the freezer.


When its ready to serve, Remove the wrap and serve immediately.


Recipe Courtesy: KevinAndAmanda

Thursday, June 16, 2016

Jam Roll / Jelly Swiss Roll


Ingredients:

Eggs                           -- 4 large
Sugar                         -- 1 1/3 cup
Water                        -- ½ cup
Vanilla                      -- 2 tsp
All-purpose flour -- 1 cup
Baking powder      -- 1 ¼ tsp
Salt -- ¼ tsp
Confectioner’s sugar -- ½ - ¾ cup(for rolling and sprinkling)
Your favorite jam or jelly -- 1 cup, or more


Preparation:

Heat the oven to 375 degrees. Generously butter a 17x12 pan. Line with a piece of parchment paper and butter it as well.

Beat the eggs until very thick and pale yellow, about 5 minutes. Gradually beat in the sugar. With the mixer on low speed, slowly add the water and vanilla. Still on low speed, gradually add the flour, baking powder, and salt, beating just until blended.

Pour the batter into the prepared pan. Be sure to spread the batter into the corners.

Bake for 12-15 minutes or until a toothpick inserted in the center comes out clean.

Meanwhile prepare a tea towel with a generous dusting of powdered sugar.


Remove the cake from the oven, loosen it from the edges of the pan, and immediately invert the hot cake onto the prepared tea towel. Carefully peel away the paper. Dust the cake with powdered sugar.

While still hot, carefully roll the cake and towel starting from the narrow end. Cool the rolled cake on a wire rack for at least 30 minutes.

Unroll the cake and remove the towel. Spread the jam or jelly over the inside surface of the cake. Re-roll the cake. Trim the edges as required.

Decorate as per your wish. This is how I did - to have it resemble the jam roll which we get back in Kerala.

Spread a thin layer of jam on the cake roll. Roll in in Sugar crystals. The jam should be just enough to hold the sugar crystals over it.


Receipe Courtesy: Lanascooking

Sunday, June 12, 2016

Crispy Coconut Cookies


Ingredients (Yields 20 - 24 cookies):

Butter -- 3 tbsp
Unsweetened shredded coconut -- 2 ½ cups
Eggs -- 2 large
Sugar -- 2/3 cup
Fleur de sel or any sea salt -- 1 – 1 ½ teaspoons


Preparation:

Preheat the oven to 350°F and line the baking sheet with parchment paper.

Melt the butter in a medium saucepan. Remove from heat and add the coconut. Mix well so the coconut is well-coated with the butter.

Beat the eggs with a mixer on medium speed just until blended. Add the sugar and beat on medium-high until the mixture is light-colored and fluffy. Combine the butter-covered coconut gently with the egg mixture and mix well.

Drop 1 tsp of the batter onto the baking sheets and press down until it is flat. Have an inch space between each cookie. Bake for 7-10 minutes until golden. Remove from the oven and immediately sprinkle the tops of each cookie with a pinch of the fleur de sel.

If the cookies sit and cool too much the fleur de sel won’t stick. As soon as they are cool, store in an air-tight container otherwise they will lose their crispness.


Receipe Courtesy: Semiswede

Thursday, June 9, 2016

Thin and Crispy Chocolate chip cookies


Ingredients(25-30 cookies):

All-purpose flour  -- 1 ¾ cups
Baking soda             -- ¾ tsp
Salt                              -- 1 tbsp
Butter                         -- 14 tbsp, melted
Light brown sugar -- ½ cup packed
Sugar                           -- ½ cup
Light corn syrup    -- 2 tbsp, optional - I did not use
Vanilla extract        -- 1 tbsp
Milk                              -- 2 tbsp
Bittersweet chocolate chips -- 1 ½ cups
Chopped nuts           -- 1 cup, optional - any nuts of your choice


Preparation:

Preheat the oven to 325 degrees. Line a baking sheet with parchment paper.

Sift together the flour, baking soda and salt.

In a mixer, cream the butter and sugars until fluffy(and corn syrup if using), 3 - 4 minutes.

Stir in the vanilla, then the milk. Add the flour mixture all at once and blend just until a dough forms.

Fold in the chocolate and nuts. Chill the dough.

Make small balls out of the dough(approx 2 tbsp), then place on the baking sheet and gently flatten them. Place about 2 inches apart

Chill the dough between batches. Bake until the edges are dark golden brown, 14 to 17 minutes.

Let cool slightly on the baking sheet, then transfer to a baking rack.


Receipe Courtesy: NY Times

Tuesday, May 31, 2016

Crispy Oatmeal cookies with white chocolate

A change from the regular chewy oatmeal cookies. That's what I searched for and this was the perfect – with a dash of white chocolate bites in it.


Ingredients(Yields 3 dozen medium size cookies):

Unsalted butter      - 1 cup, softened at room temp
Light brown sugar - 1 cup, packed
Sugar                           - 1 cup
Vanilla                        - 1 tsp
Eggs                             - 2
Salt                               - 1 tsp
Baking soda              - 1 tsp
All purpose flour   - 1½ cups
Sweetened flaked coconut - ¾ cup
Old fashioned oats  - 3 cups
White chocolate chips - 1 cup


Preparation:

Preheat oven to 350°.  Line baking sheet with parchment paper. Set aside.

Cream butter and sugar until light and fluffy - approximately 2 minutes. Add in eggs and vanilla and continue mixing until smooth.

Add salt, baking soda and flour and mix until incorporated. Then add in coconut flakes. Mix. Finally mix in oats and white chocolate until evenly combined.

Make balls about 1.5 tbsp and place it on the lined sheet. Lightly press to flatten.  Bake for 12­ - 15 minutes until edges are golden brown.

Allow to cool on wire rack. Store airtight for up to 3 days.


Recipe Courtesy: Cookies and Cups

Sunday, May 8, 2016

Cream Cheese Pound cake


Ingredients:

All-purpose flour  - 2 cups
Baking powder       - 1 ½ tsp
Salt                              - ½ tsp
Cream cheese         - 1 (8 ounce) package, softened
Unsalted butter     - ¾ cup (1 ½ sticks), at room temperature
Granulated sugar  - 1 ½ cups
Orange zest              - 2 tbsp
Eggs                            - 4 large
Vanilla extract       - 2 tsp
Orange juice            - 3 tbsp fresh


Preparation:

Grease and flour a 9 x 5 inch loaf pan. Set aside. Preheat the oven to 325 degrees F, with the rack in the center.

In a medium bowl, whisk together flour, baking powder, and salt. Set aside.

Place the granulated sugar in a big bowl. Add the orange zest. Mix / Rub well to create orange flavored sugar. Set aside.

In the bowl of an electric stand mixer fitted with a paddle attachment, cream together softened butter and cream cheese. Scrape down the sides in-between and make sure that they are mixed evenly.

Add the citrus sugar to the butter and cream cheese mixture, and beat on medium speed until smooth and creamy, about 3 minutes.
Stop the mixer. Scrape down the sides of the bowl.

On medium speed, beat in one egg at a time, beating for one minute after each addition. Stop the mixer and scrape down the sides of the bowl as necessary.

Beat in vanilla extract and orange juice.

Add dry ingredients all at once. Beat on low speed until dry ingredients are completely incorporated.

Spoon batter into prepared pan. Bake for 40 - 50 minutes, rotating once or twice during baking. Bake until a skewer inserted in the center comes out clean, or with just a few crumbs.


Recipe Courtesy: Joy the baker

Thursday, April 14, 2016

Chocolate Cupcakes with Milk chocolate frosting


(Yields - 14 - 16 cupcakes):

Unsweetened natural cocoa powder -- ½ cup (42g)
All-purpose flour -- ¾ cup (95g) , spoon & leveled
Baking soda            -- ½ tsp
Baking powder      -- ¾ tsp
Salt                             --  ¼ tsp
Eggs                           -- 2 large
Granulated sugar -- ½ cup (100g)
Light brown sugar -- ½ cup (100g) packed
Vegetable oil          -- 1/3 cup (80ml)
Vanilla extract      -- 2 tsps
Buttermilk               -- ½ cup (120ml)


Milk Chocolate Frosting:

Unsalted butter           -- 1 cup (230g) , softened to room temperature
Confectioners' sugar  -- 3 ½ cups (420g)
Unsweetened cocoa powder -- ½ cup (45g)
Salt                                    -- ½ tsp
Vanilla extract             -- 2 tsps
Heavy cream                -- 3 Tablespoons (45ml)


Preparation:

Preheat the oven to 350°F (177°C). Line a 12-cup muffin pan with cupcake liners. Set aside.

In a large bowl, whisk the cocoa powder, flour, baking soda, baking powder, and salt together until thoroughly combined. Set aside.

In a medium bowl, whisk the eggs, sugar, brown sugar, oil, and vanilla together until completely smooth.

Pour half of the wet ingredients into the dry ingredients. Then half of the buttermilk. Gently stir - about 5 stirs. Repeat with the remaining wet ingredients and buttermilk. Stir until *just* combined. Make sure that you do not overmix.


The batter won't be very thick. Fill the cups only halfway to avoid spilling over the sides. Bake in batches for 18-19 minutes, or until a toothpick inserted in the center comes out clean.

Allow to cool completely before frosting.


Frosting:

Using a handheld or stand mixer fitted with a paddle attachment, beat the butter on high speed until smooth and creamy - about 2 minutes.

Turn speed to LOW and slowly add 3 cups of confectioners' sugar, the cocoa powder, and salt. Beat until sugar/cocoa are absorbed into the butter, about 2 minutes.

Turn mixer to medium speed and add the vanilla and cream. Once added, turn the mixer to high speed and beat for 1 minute.

Add the remaining confectioners' sugar if you like to increase the frosting's thickness. Pipe or spread the frosting onto the cooled cupcakes.


Recipe Courtesy: Sally's Baking addiction

Friday, August 7, 2015

Tres Leche Cake

Tres Leche 1

Ingredients:

All purpose flour --   1 cup
Baking Powder      --   1½ tsp
Salt                             --   ¼ tsp
Eggs                           --   5 , separated
Sugar                        --   1 cup(for cake)  + 3 tbsp for icing
Vanilla                     --   1 tsp
Milk                           --   1/3 cup
Evaporated Milk  --   1 can
Sweetened Condensed Milk --   1 can
Heavy Cream         --   ¼ cup + 1 pint for icing

Tres Leche 3

Preparation:

Preheat oven to 350 degrees. Prepare a 9 x 13 inch pan coating well with butter / spray. I used an 8 inch pan which was 2" deep.

Sift together the flour, baking powder, and salt in a large bowl. Beat egg yolks with ¾ cup sugar on high speed until yolks are pale yellow. Stir in milk and vanilla.Pour egg yolk mixture over the flour mixture and stir very gently until combined.

Beat egg whites on high speed until soft peaks form. Add ¼ cup sugar and beat until egg whites are stiff but not dry.

Fold in the egg white mixture into the batter until just combined.

Pour into prepared pan and bake for 35 to 45 minutes or until a toothpick comes out clean. Let it cool.

Mix condensed milk, evaporated milk, and ¼ cup heavy cream.

Tres Leche

Pierce the surface of the cool cake with a fork. Slowly drizzle the milk mixture. Try to get as much around the edges of the cake as you can.

Let the cake absorb the milk mixture. I prefer it to be chilled - keep in the refrigerator

Whip the remaining heavy cream with sugar until thick and spread it over the cake. Cut into squares and enjoy !!!

Tres Leche 2


Recipe Courtesy: Chefinyou

Sunday, October 19, 2014

Perfect Pound Cake

Perfect Pound Cake 3

Ingredients:

All Purpose flour  --   200g
Baking powder       --   ¼ tsp
Salt                              --   ¼ tsp                   
Unsalted butter     --   227g/2 sticks(softened)
Granulated sugar  --   250g
Eggs                            --   4 Large, at room temperature
Lemon zest              --   1 tsp
Vanilla extract      --   1 tsp
Heavy cream         --   80ml

Perfect Pound Cake 1

Preparation:

Preheat oven to 350 F. Prepare a 4 x 8 inch pan - Grease and line it with parchment paper.

Sift flour with baking powder and salt and set aside.

Cream the softened butter in a mixer at medium high speed until creamy (about 2 mins). Add sugar and continue beating for about 4 mins until light and fluffy.

Reduce the speed to low and add the eggs one at a time, until well blended.

Perfect Pound Cake 0

Add the lemon zest and vanilla extract.

Add flour mixture in 3 additions, alternating it with heavy cream.

Pour into prepared pan and bake for 60-70 mins (It took 68 mins for me) , until the cake turns brown and a skewer comes out clean.

Perfect Pound Cake 2

Recipe Courtesy: Shirley